객체를 자유롭게 꾸밀 수 있는 패턴인 Decorator 패턴에 대해 정리해보려 한다. 간단히 말해, Decorator 패턴은 이름에서도 알 수 있듯이, 객체를 자유롭게 장식할 수 있는 패턴이다.
우선, 이 패턴의 UML 다이어그램을 보자.

위 다이어그램에 나오는 각 요소들은 아래와 같은 역할을 수행한다.
- Component: 장식으로 꾸밀 대상이 되는 객체를 나타내며, 단순하게 인터페이스만을 제공한다.
- ConcreteComponent: Component 객체를 구체화한 객체로, 다양한 장식으로 꾸며질 수 있는 객체이다.
- Decorator: Component를 꾸밀 수 있는 객체이며, 동시에 Component를 상속받아 Component와 같은 역할을 수행할 수 있는 객체이다.
- ConcreteDecorator: Decorator 객체를 구체화한 객체로 ConcreteComponent를 꾸밀 수 있는 객체이다.
이제 이 UML에 대한 이해를 바탕으로 예제 코드를 하나씩 살펴보자. 참고로, 이 예제 코드는 Java 언어로 배우는 디자인 패턴 입문에 있는 예제로 특정 문자열에 여러 장식을 포함하여 출력해주는 기능을 수행한다.
우선, Component 에 해당하는 Display 클래스는 다음과 같다.
    public abstract class Display {
      public abstract int getColumns();
      public abstract int getRows();
      public abstract String getRowText(int row);
      public final void show() {
        for(int i = 0; i < getRows(); i++) {
          System.out.println(getRowText(i));
        }
      }
    }
getColumns 와 getRows 메소드는 각각 가로, 세로 문자수를 가져오는 기능을 수행하며, getRowText 는 해당 행에 있는 문자열을 반환한다. 그리고 show 메소드는 모든 행을 순환하면서 각 행의 문자열을 화면에 보여준다.
다음은 Display 클래스를 구체화 한 StringDisplay 클래스이다.
    public class StringDisplay extends Display {
      private String string;

      public StringDisplay(String string) {
        this.string = string;
      }

      public int getColumns() {
        return this.string.getBytes().length;
      }

      public int getRows() {
        return 1;
      }

      public String getRowText(int row) {
        return row == 0 ? this.string : null;
      }
    }
코드는 아주 심플하기에 별 다른 설명은 필요없을 것 같고, 다만, getColumns 메소드의 경우 문자가 화면에 출력될 때 실제로 차지하는 길이를 측정하기 위해 문자열의 바이트 수를 반환한다는 것만 주목하면 될 것 같다.
이제, Decorator 역할을 수행하는 클래스인 Border 클래스를 살펴보자.
    public abstract class Border extends Display {
      protected Display display;
      protected Border(Display display) {
        this.display = display;
      }
    }
Border 클래스는 Display 클래스를 상속받고 있음에 주의하자. 이렇게 함으로써, 꾸미는 대상 객체(Component)와 꾸미는 객체(Decorator)가 동일 시 된다. 또한 Display 인스턴스를 멤버로 가지기도 하는데, 결국, 이 멤버를 꾸미는 역할을 Border 클래스가 수행하는 것이다.
다음은, Border 클래스를 구체화 한 SideBorder 클래스인데, 이는 아래와 같이 문자열의 좌우에 특정 문자를 붙여 꾸며주는 역할을 수행한다.
| 문자열 |
코드를 보자~
public class SideBorder extends Border {
  private char borderChar;
  public SideBorder(Display display, char ch) {
    super(display);
    this.borderChar = ch;
  }

  public int getColumns() {
    return 1 + this.display.getColumns() + 1;
  }

  public int getRows() {
    return this.display.getRows();
  }

  public String getRowText(int row) {
    return borderChar + display.gerRowText(row) + borderChar;
  }
}
SideBorder 클래스는 문자열에 특정 문자를 좌우로 붙여주는 역할을 하기 때문에 getColumns 메소드는 문자열의 길이에 좌, 우 한 문자씩을 더한 값을 반환하며, getRowText 메소드는 문자열의 좌, 우에 특정 문자를 합한 문자열을 반환한다.
또 다른 Decorator 역할을 해 줄 FullBorder 클래스를 볼텐데, 이 클래스는 문자열의 상,하,좌,우에 장식을 더해준다. SideBorder 클래스와 같은 형태이므로 구구절절 설명은 생략하고, 바로 소스 코드를 살펴보자.
public class FullBorder extends Border {
  public FullBorder(Display display) {
    super(display);
  }

  public int getColumns() {
    return 1 + display.getColumns() + 1;
  }

  public int getRows() {
    return 1 + display.getRows() + 1;
  }

  public String getRowText(int row) {
    if(row == 0 || row == display.getRows() + 1) {
      return "+" + makeLine('-', display.getColumns()) + "+";
    } else {
      return "|" + display.getRowText(row-1) + "|";
    }
  }

  private String makeLine(char ch, int count) {
    StringBuffer buf = new StringBuffer();
    for (int i = 0; i < count; i++) {
      buf.append(ch);
    }
    return buf.toString();
  }
}
소스 코드가 복잡하지 않아 이해하는데 무리가 없으리라 생각한다. FullBorder 클래스가 문자열의 상하좌우에 특정 문자로 꾸며주는 역할을 수행함을 고려하며 본다면, 전혀 어렵지 않은 코드이다.
이제 지금까지 만들었던 클래스들을 이용하는 클라이언트 쪽 코드를 보자.
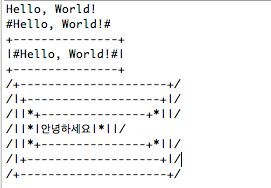
Display b1 = new StringDisplay("Hello, World!");
Display b2 = new SideBorder(b1, '#');
Display b3 = new FullBorder(b2);
b1.show();
b2.show();
b3.show();
Display b4 = new SideBorder(
                             new FullBorder(
                                    new FullBorder(
                                            new SideBorder(
                                                    new FullBorder(new StringDisplay("안녕하세요"))
                                                    , '*')
                                            )
                                        )
                        , '/');
아래는 위 코드에 따르는 결과이다.
이제 슬~ 마무리다!!
예제 코드를 통해 좀 더 Decorator 패턴에 대해 이해를 더 많이할 수 있었으리라 생각된다. 다시 한번 정리하자면, Decorator 패턴은 꾸미는 객체와 꾸밈의 대상 객체로 하여금 동일한 객체를 상속받도록 하여, 대상 객체를 자유롭게 새로운 기능들로 꾸밀 수 있게 해주는 패턴이다.
이렇게 Decorator 패턴에 대한 정리는 끝~